AdSense Code in Blogger Post Body
One of the known tips for improving the performance of your Google AdSense ads is knowing where to place the ads. In this guide, we shall discuss the modification you can make to your Blog template to have your Google AdSense ads appear between your post title and post body, or between your post body and post footer. Also, we shall have the AdSense ads appear on every individual post.
Many people believe that having AdSense ads just before or after the Blog posts will best optimize their performance. At the moment, if you login to your Dashboard and go to Template -> Page Elements -> Add a Page Element, you can place an AdSense ad right before or after the post body. However, the ad will either appear on top of your post title or right below your post footer labels. If you have set your Blog to display a few posts on the main page, this AdSense ad will appear at the bottom after all the posts, and not below every individual post. Today, for the purposes of this article and to give you an idea how it would look, we have inserted the AdSense code into our template to have the ads appear immediately below the article and before the post footer. If you think you would like to do the same for your Blog, the following are the steps you should take.
We assume you have a Google AdSense account. If you don't, you can create one using the same login through your Google account. You will be assigned a Publisher identity number which shall appear in all your AdSense codes.
Log in to your Google AdSense account.
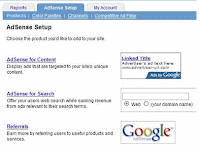
 Go to AdSense Setup -> Products and choose “AdSense for Content”.
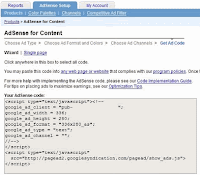
Next, select “Ad unit” and follow their instructions on picking the size of ad, color combination, and so on, right till the end when they automatically generate a HTML code for you. Copy this code and paste it into Microsoft Notepad. (If you are a WinXP user, click the Start button at the bottom left corner of your screen. Under All Programs -> Accessories, you should see the MS Notepad icon.)
 Change the AdSense code
This heading may sound misleading. We are not at all altering the code but converting some of the characters to character entities. We have to parse the AdSense code so that it can be included into your Blog template. This essentially involves replacing the following HTML characters:-
< with <
> with >
" with "
Your final Google AdSense Code should look something like this:-
<script type="text/javascript"><!-- |
Insert code into template
Login to your Dashboard. Go to Template -> Edit HTML and click the box next to “Expand Widget Templates”.
Block copy the entire HTML code for your site that you presently have and save it in a separate text file in MS Notepad. This is one of the two necessary steps whenever you want to change the template. The second step is to “Preview” the new changes, and save the changes only when you are satisfied. The backup you have saved in a text file will come in handy when you accidentally click to save the changes without previewing them. With a backup, you can easily restore the template to the prior state if need be.
Now search for post.body through your browser's search function (Ctrl+F for Firefox and IE). You should see these lines:-
<div class='post-body'> |
If you want the AdSense ads to appear between the post title and post body, add the following code above the orange lines. If you want the AdSense ads to appear immediately after every individual post, add the following code below the orange lines. The code to add is:-
<div style='float:left;'> |
The AdSense Code is the one you have amended above in MS Notepad. Do NOT save the template, but click the Preview button to see if you like the placement of the AdSense ads.
Do you want to have the AdSense code on the left of your text as shown in this screenshot?
<div class='post-header-line-1'/> |
If you want the Ads on the right of the text, like this:-

Insert the code as follows:-
<div class='post-header-line-1'/> |
Set the AdSense ad margins
If your AdSense ads are too close to the edge, you may set a margin in the style tag. To give you an idea how wide the margin should be, you can see the sample in our other Business Fables blog where the left margin is set to 30px. The code used was:-
<div style='float:left; margin-left:30px'> |
Should you want to align the AdSense ad to yo
ur text, you can specify a margin or padding around the entire AdSense code. The code you can use is:-
<div style='float:left; margin:5px |
The first number 5px is for the top margin, 10px is for the right margin, 15px for the bottom margin, and 20px for the left margin. You should of course change these values to suit your template.
Preview the template and if you are satisfied, save the template and refresh your Blog to see the new positions of your AdSense ads.
from


0 komentar:
Post a Comment