free download

nonton youtube dibayar,daftar gratis dapet dollar

Paid2YouTube.com

Bisnis Sukses Internet

Showing posts with label Trik blogger.v.inggris. Show all posts

Monday, June 18, 2007

Hide or Remove Navbar in Blogger

The Blogger or Blogspot Navbar is a default feature that appears at the top of every Blogger powered blog. It is a useful navigation tool which allows readers to search the blog for targeted content, mark the blog as objectionable, and randomly view other member blogs.


The Navbar can be disabled for users who publish contents via FTP, but it will appear on all freely hosted BlogSpot blogs. While the feature is undeniably useful, some people find that its position at the top of the page looks obtrusive even with a choice of 4 colors. Some therefore pick a template with a black background to blend well with a black navigation bar. There are also parents and educators who find the 'view random blogs' feature inappropriate, as their children may inadvertently view objectionable blogs.Nevertheless, this article is not a discussion on the merits or demerits of a Navbar. That is for you to decide. Here, I am assuming that you have made a conscious decision to hide or remove the Navbar. Having so decided, this is the guide on how you can do it.

Log into your dashboard, go to Template -> Edit HTML. Scroll to anywhere on the template and insert the following CSS style definition in red within the head section.


<style type='text/css'>

#navbar-iframe {


display: none;


}


</style>


</head>


Preview the template. You will notice that the Navbar is no longer displayed, and (depending on your template) your contents might shift upwards to take up the space reserved for the Navbar.

Now, try this style definition:-


<style type='text/css'>


#navbar-iframe {


height: 0px;


}


</style>


This will reduce the Navbar height to zero, effectively removing the Navbar. You can also explore this other style:-


<style type='text/css'>


#navbar-iframe {


visibility: hidden;


}


</style>


You will notice that your contents do not shift upwards. The space is still reserved for the Navbar, but the Navbar is now hidden and not visible.

Either one of the above codes would do. You can also combine 2 or 3 of them if you'd like, as what our reader Haunted TUNA did. For example, giving a numerical value for the height of the Navbar and hiding the visibility will give you a margin at the top and yet without the Navbar. Choose one that best fits your blog design. If you change your mind in future, and wish to have back your Navbar, simply remove the style definition.
from Tips for New Bloggers

Read more...

Animated Banner with Rotating Headlines

This article is about creating a nice looking banner that incorporates rotating headlines of your 5 recent Blog articles. If you have submitted your Blog to different Blog Directories, you would come across some which ask for your banner. It is nothing more than a picture to represent your Blog.
Nonetheless, a nicely designed banner can attract more visitors and add a touch of professionalism to your Blog. I am not a graphic designer and I believe you can produce much nicer pictures. There are also GIF animator softwares on the net which will help you create a moving image, blinking text, and so on. What I intend to do here is to share with you alternative ideas on how you can create your own unique animated banner.


Look at this example I made for my other blog. Notice how the titles of the 5 recent posts, taken from the site's feed, are rotated in the banner. Instead of a plain image, the headline animation adds life and attracts readers who want to read the details of your articles to click the banner.


This is done through a popular feed aggregator service called Feedburner. If you do not have an account with them, go to their main page, type in your Blog URL and follow their instructions to create a free account. Even if you have subscribed to other feed services like Feedblitz, there is no harm having more service providers publicize your Blog for free.

Once you have successfully created an account, you can browse through their services and tools to pick the ones that you like. Here, we shall talk only about their Headline animator. Go to “Publicize” tab and “Headline Animator” to create a new animated banner.


The instructions given by Feedburner are pretty simple to follow. The first thing you need to do is to pick a “theme” which can be their standard black and white backgrounds, or their dynamic and seasonal images. If you merely want to test the outcome, pick any of the schemes. The normal banner size is 468px x 60px and you may want to use this for a start. After that, choose the colors, font size, and position the title, date and headline. Click “Activate” when you are done. They will generate a HTML code for you to copy and paste into your template.


While this may give you a banner that contains the headlines of your posts, it does not give you a unique identity. If you have the time, you should try to create your own banner image. For instance, if you have a nice picture that you like, crop it or resize it to 468px x 60px using a photo editing software. If you don't have one, you may try Google's Picasa or search the net for other free softwares. If possible, leave a clear background somewhere for the date and headline. Save the image in the .gif (not .jpg) format. A background image can look like these.


The image will have to be uploaded onto an image host. There are a number of free hosts available on the net. You can upload your image onto GooglePages or Google Groups, Photobucket, Blogpulp, or any other free hosts that offer direct links to these files. After uploading the image file, take note of the image URL.

Go back to Feedburner's “Publicize” tab. This time, under the “Theme” select “Provide your own background”. You will be prompted to enter the “Image URL”. Again, you can adjust the positions of the title, date and headline by dragging them to the desired positions. Click “Activate” once you are satisfied with the layout and obtain the generated HTML code.

Log in to your Dashboard, go to Template ->Page Elements -> Add a Page Element and choose “HTML/JavaScript”. Copy the generated HTML code, paste and save. If you want to use this banner for publicizing your Blog in blog directories or advertisements, your new animated banner URL is your Feedburner feed address with a .gif extension
from Tips for New Bloggers

Read more...

AdSense Code in Blogger Post Body

One of the known tips for improving the performance of your Google AdSense ads is knowing where to place the ads. In this guide, we shall discuss the modification you can make to your Blog template to have your Google AdSense ads appear between your post title and post body, or between your post body and post footer. Also, we shall have the AdSense ads appear on every individual post.

Choosing a best placement for your AdSense ads will attract more attention; attention leads to clicks; and clicks bring you AdSense revenue. Easier said. While people may have theories on where the ideal AdSense spot ought to be, there is really no standard answer because it depends very much on your Blog's layout, contents, theme, etc. If you have been following the changes made to our Blog, you would agree that we are no guru at this. We had merely placed the ads where they fit aesthetically and not where they will get the most attention. Nevertheless, if you would accept our two cents' worth of opinion, try to put yourself in the minds of your readers. Ask questions like why readers visit your Blog, which section of the Blog are they most interested in, and whether placing an ad at a particular area will distract, annoy or please them.

Many people believe that having AdSense ads just before or after the Blog posts will best optimize their performance. At the moment, if you login to your Dashboard and go to Template -> Page Elements -> Add a Page Element, you can place an AdSense ad right before or after the post body. However, the ad will either appear on top of your post title or right below your post footer labels. If you have set your Blog to display a few posts on the main page, this AdSense ad will appear at the bottom after all the posts, and not below every individual post. Today, for the purposes of this article and to give you an idea how it would look, we have inserted the AdSense code into our template to have the ads appear immediately below the article and before the post footer. If you think you would like to do the same for your Blog, the following are the steps you should take.

We assume you have a Google AdSense account. If you don't, you can create one using the same login through your Google account. You will be assigned a Publisher identity number which shall appear in all your AdSense codes.

Log in to your Google AdSense account.
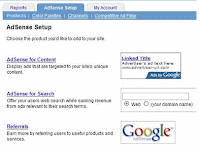
Go to AdSense Setup -> Products and choose “AdSense for Content”.

Next, select “Ad unit” and follow their instructions on picking the size of ad, color combination, and so on, right till the end when they automatically generate a HTML code for you. Copy this code and paste it into Microsoft Notepad. (If you are a WinXP user, click the Start button at the bottom left corner of your screen. Under All Programs -> Accessories, you should see the MS Notepad icon.)
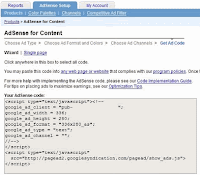
Change the AdSense code

This heading may sound misleading. We are not at all altering the code but converting some of the characters to character entities. We have to parse the AdSense code so that it can be included into your Blog template. This essentially involves replacing the following HTML characters:-

< with <
> with >
" with "

Your final Google AdSense Code should look something like this:-


&lt;script type=&quot;text/javascript&quot;><!--

google_ad_client = "pub-0000000000000000";

google_ad_width = 336;

google_ad_height = 280;

google_ad_format = "336x280_as&amp;amp;quot;;

google_ad_type = "text";

google_ad_channel = "";

google_color_border = "FFFFFF";

google_color_bg = "FFFFFF";

google_color_link = "000000";

google_color_text = "000000";

google_color_url = "000000";

//--></script&gt;

<script type=&quot;text/javascript&quot;

src=&quot;http://pagead2.googlesyndication.com/pagead/show_ads.js&quot;>

</script&gt;


Insert code into template

Login to your Dashboard. Go to Template -> Edit HTML and click the box next to “Expand Widget Templates”.

Block copy the entire HTML code for your site that you presently have and save it in a separate text file in MS Notepad. This is one of the two necessary steps whenever you want to change the template. The second step is to “Preview” the new changes, and save the changes only when you are satisfied. The backup you have saved in a text file will come in handy when you accidentally click to save the changes without previewing them. With a backup, you can easily restore the template to the prior state if need be.

Now search for post.body through your browser's search function (Ctrl+F for Firefox and IE). You should see these lines:-


<div class='post-body'>

<p><data:post.body/></p>

<div style='clear: both;'/> <!-- clear for photos floats -->

</div>


If you want the AdSense ads to appear between the post title and post body, add the following code above the orange lines. If you want the AdSense ads to appear immediately after every individual post, add the following code below the orange lines. The code to add is:-


<div style='float:left;'>

AdSense Code

</div>


The AdSense Code is the one you have amended above in MS Notepad. Do NOT save the template, but click the Preview button to see if you like the placement of the AdSense ads.

Do you want to have the AdSense code on the left of your text as shown in this screenshot?
Choose the smallest AdSense format like 125x125. Insert the AdSense code here:-


<div class='post-header-line-1'/>

<div style='float:left;'>

AdSense Code

</div>


<div class='post-body'>

<p><data:post.body/></p>

<div style='clear: both;'/> <!-- clear for photos floats -->

</div>


If you want the Ads on the right of the text, like this:-
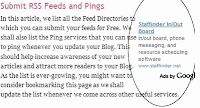


Insert the code as follows:-


<div class='post-header-line-1'/>

<div style='float:right;'>

AdSense Code

</div>


<div class='post-body'>

<p><data:post.body/></p>

<div style='clear: both;'/> <!-- clear for photos floats -->

</div>


Set the AdSense ad margins

If your AdSense ads are too close to the edge, you may set a margin in the style tag. To give you an idea how wide the margin should be, you can see the sample in our other Business Fables blog where the left margin is set to 30px. The code used was:-


<div style='float:left; margin-left:30px'>

AdSense Code

</div>


Should you want to align the AdSense ad to yo
ur text, you can specify a margin or padding around the entire AdSense code. The code you can use is:-


<div style='float:left; margin:5px
10px 15px 20px'>


AdSense Code

</div>


The first number 5px is for the top margin, 10px is for the right margin, 15px for the bottom margin, and 20px for the left margin. You should of course change these values to suit your template.

Preview the template and if you are satisfied, save the template and refresh your Blog to see the new positions of your AdSense ads.
from Tips for New Bloggers

Read more...

Add Page Element to Blogger Header and Blog Posts

In the standard “Minima” template, you would notice under “Page Elements” that there are options to add a Page Element to the sidebar and the footer. However, there is none for the Header and Blog Posts. Having a Page Element option to these latter two is useful. You may want to add a picture at the top, or a Google Adsense ad at the top or bottom of your blog posts.

To have an “Add a Page Element” option, under “Template”, click “Edit HTML”. Scroll down and towards the bottom, you will see these lines:-


<div id='header-wrapper'>

<b:section class='header' id='header' maxwidgets='1' showaddelement='no'>


Change them to this:-


<div id='header-wrapper'>


<b:section class='header' id='header' maxwidgets='3'
showaddelement='yes'>


This will give you 2 more page elements that you can add to your Header.

Right after that are these lines:-


<div id='main-wrapper'>


<b:section class='main' id='main' showaddelement='no'>


Change them to this:-


<div id='main-wrapper'>


<b:section class='main' id='main' showaddelement='yes'>


You are now able to add Page Elements either before or after your Blog Posts.
Once these are done, Save the Template. Click the “Page Elements” tab, and you will now see “Add a Page Element” option at the top of the Header and Blog Posts. Assuming you decide to add the element below the Header or Blog Posts, not to worry. Simply create whatever element you want and save. Next, drag and drop the element to the bottom of the Header or Blog Posts. Click the Save button at the top right hand corner of the page, and your settings have been saved.
from Tips for New Bloggers

Read more...

Sunday, June 17, 2007

Add Blogger search box

The Google Navigation bar at the top of your Blogger blogs has an embedded search box. However, you may want to include a similar box in the main body of your blog (like what I have done), or the sidebar. Other than the convenience for users, the added advantage is that unlike Google search box, the search results of this Blogger.com search box appear in the main body of your Blog.


Under Template->Page Elements tab, click “Add a Page Element” at the place where you want your search box to appear. Select “HTML/JavaScript”.

There are several HTML codes posted on the net. I tried a few, and found the one that works as follows:-


<p align="left">

<form id="searchthis" action="YOUR
BLOG URL
/search" style="display:inline;" method="get">

<strong>NAME OF YOUR BLOG<br/></strong>

<input id="b-query" maxlength="255" name="q"
size="20" type="text"/>

<input id="b-searchbtn" value="Search" type="submit"/>

</form></p>

NAME OF YOUR BLOG


Remember to change YOUR BLOG URL to the URL or web address of your Blog. Also, change the NAME OF YOUR BLOG to that which you want to call your site. For instance, if your Blog Name is long, you may want to write something like “Search Here” or “Search this site”.

You can also change the “Search” button to say, “Hit” or “Go”, by changing the Value.

Save the code and refresh your page. If you want a longer or shorter search box, you can play around with the size. The above example of a width size="20" and value="Hit" will give you this:-

Image instead of Search button

ust for the fun of it, if you want readers to click an image instead of a button, you will first need to do up a small picture. You can also resize a picture you already have with photo editing tools like Google's Picasa. After creating a picture, upload it onto a free server like GooglePages or Google Groups, or other free hosts that offer direct links to the image files. Take note of this IMAGE URL.

The HTML code to insert is this:-


<p align="left">

<form id="searchthis" action="YOUR
BLOG URL
/search" style="display:inline;" method="get">

<strong>NAME OF YOUR BLOG<br/></strong>

<input id="b-query" maxlength="255" name="q"
size="20" type="text"/>

<input id="b-searchbtn" type="image" src="IMAGE
URL
" align="top"/>

</form></p>


Remember to insert into the code the IMAGE URL, where your picture is uploaded. You can align the image to the top, bottom or set a horizontal space between the bar and the image by using a hspace tag. For more examples on alignment of images, you may refer to the article Hyperlinks and Image Links (II).

While it is alright to replace the button of your Blogger search box, you may not want to do that with the Google search box since their T.O.S. disallows any alteration of their code.
from Tips for New Bloggers


Read more...

Thursday, June 14, 2007

Further Blogger Access.

We’re apparently taking a guided tour of the Kremlin tomorrow with the rest of the press here. Fancy that. I suspect we’ll have some thoughts, observations, and perhaps even pics (maybe not those).

Near our hotel is a swanky, Euro-posh-looking nightclub named “Night Flight.” We haven’t been there yet. One reason why: a $35 cover. But Leafs’ scout Shawn Simpson swears it’s filled with “first-line talent.” And we have digital cameras. Think we should visit on Friday night?

[Note from OrderedChaos: If Pucks tries taking photos in that club, he may end up getting shots of the inside of a Siberian prison instead. Which, now that I think of it, could make for an interesting story… so go for it Pucks!

Read more...

Bisnis rumahan Internet

Tomodachi banner link

Tampilkan Yahoo emoticons

YAHOO! Emoticons untuk blog anda
silahkan gunakan icon yahoo ini untuk blog anda,klick icon yang anda inginkan.lalu liat dan copy kodenya pada box di bawah..

click icon yang anda inginkan


silahkan copy code di bawah ini...


Collection Blog Archive

  © Syamcollection 2010kiat SUKSES Optimalkan WEBSITE/BLOG, Otak atik BLOG,SEO,freeAFFILATE,freePROGRAM,freeSOFTWARE

Back to TOP